Secrets: Perfect Beef Top Loin New York Strip Steak!

Achieving a truly perfect beef top loin new york strip steak might seem like a culinary secret, but it's within reach with the right approach. Marbling, a key attribute of quality beef, significantly impacts the tenderness and flavor of your steak. For the best results, consider the source: Creekstone Farms is renowned for their premium cuts. Furthermore, mastering the reverse sear technique, a favorite of many home cooks, ensures a beautifully even cook throughout. Finally, selecting the proper cast iron skillet is an integral part of getting that amazing sear, giving you an amazing restaurant quality steak in your own home.

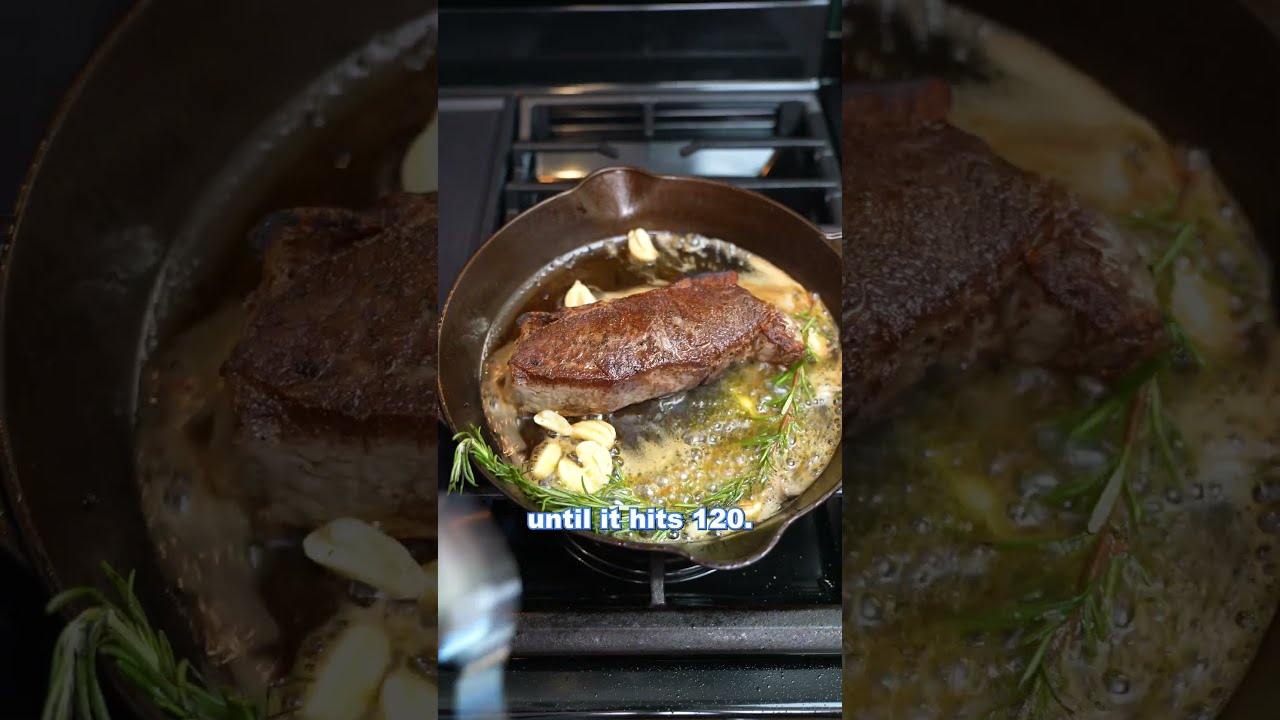
Image taken from the YouTube channel Hey Grill Hey , from the video titled How to Grill the BEST New York Strip Steak of your LIFE!!! .
There's a primal satisfaction in sinking your teeth into a perfectly cooked New York Strip steak. The rich, beefy flavor, the tender texture, and the satisfying sear – it's a culinary experience that tantalizes the senses and leaves you craving more.
But for many home cooks, achieving that steakhouse-quality result can feel like an elusive dream. We've all been there: a promising cut of meat turns into a dry, gray disappointment despite our best efforts.
The challenge lies not in the complexity of the dish itself, but in mastering a few key techniques that transform ordinary into extraordinary.
The good news is, you can consistently create a New York Strip steak that rivals your favorite restaurant's.
This isn't about secret ingredients or fancy equipment; it's about understanding the science behind the sear and the art of temperature control.
The Home Cook's Steakhouse Dilemma
Why is it so difficult to replicate that steakhouse experience at home?
There are several factors at play. Professional kitchens often have access to higher grades of beef, and they utilize powerful equipment like infrared broilers that can reach incredibly high temperatures.
However, the most significant difference often comes down to technique: a deep understanding of how heat affects the meat and the meticulous execution of proven methods.
Home cooks often struggle with:
- Consistent searing.
- Accurate temperature monitoring.
- Proper seasoning techniques.
Unlocking Steakhouse Secrets
The path to steak perfection lies in demystifying the cooking process. It's about understanding how each step contributes to the final result and learning how to control the variables that impact flavor and texture.
This involves focusing on a few core principles:
- Selecting high-quality ingredients.
- Mastering the sear.
- Understanding internal temperature.
- Seasoning effectively.
The Cornerstone of Success: Temperature, Searing, and Seasoning
The secret to consistently cooking a perfect New York Strip steak lies in mastering three crucial elements: internal temperature, searing technique, and thoughtful seasoning.
These three pillars work in harmony to create a steak that is not only cooked to your precise preference but also boasts a flavorful crust and a tender, juicy interior.
Internal temperature is your guide to doneness, ensuring the steak is cooked to your desired level of rareness or well-done.
Searing is the art of creating a flavorful crust, adding depth and complexity to the steak's flavor profile.
Seasoning enhances the natural flavors of the beef, creating a symphony of taste that tantalizes the palate.
By focusing on these three key elements, you can transform your home kitchen into your very own steakhouse, delivering consistently perfect New York Strip steaks that will impress your family and friends.
The challenge lies not in the complexity of the dish itself, but in mastering a few key techniques that transform ordinary into extraordinary. The good news is, you can consistently create a New York Strip steak that rivals your favorite restaurant's. This isn't about secret ingredients or fancy equipment; it's about understanding the science behind the sear and the art of temperature control.
Now, before we dive into grilling and searing techniques, let's get to know the star of our show a little better. Understanding the New York Strip – its characteristics, quality markers, and flavor potential – is crucial to achieving a truly exceptional steak.
Understanding the Star: The Beef Top Loin (New York Strip) Explained
The New York Strip. The Manhattan. The Strip Loin. Whatever you call it, this cut of beef commands respect. But what exactly is it, and why is it so beloved by steak enthusiasts around the world? Let's break it down.
Defining the New York Strip
The New York Strip steak is a premium cut taken from the beef top loin, a muscle that runs along the back of the cow behind the ribs. This area is relatively unused, resulting in a tender cut of meat with a distinct, tight grain.
It's easily identified by its rectangular shape and a noticeable band of fat along one side. This fat cap renders during cooking, basting the steak and contributing to its rich flavor.
Unlike a ribeye, the New York Strip typically has less internal marbling, offering a leaner, beefier flavor profile. It strikes a balance between tenderness and robust taste, making it a versatile and satisfying choice.
The Enduring Popularity of the Strip
Why is the New York Strip such a popular selection on steakhouse menus and at butcher counters? Several factors contribute to its enduring appeal:
-
Flavor: Its assertive, beefy flavor appeals to those who appreciate a more straightforward steak experience.
-
Texture: The firm yet tender texture provides a satisfying chew.
-
Versatility: It can be grilled, pan-seared, broiled, or even cooked sous vide with excellent results.
-
Presentation: Its uniform shape and attractive appearance make it an excellent choice for elegant plating.
The New York Strip offers a compelling combination of flavor, texture, and cooking versatility, solidifying its place as a classic steakhouse favorite.
The Importance of Marbling and Grade
When selecting a New York Strip steak, pay close attention to two crucial factors: marbling and grade. These indicators provide valuable insights into the steak's potential tenderness and flavor.
-
Marbling: Refers to the flecks of intramuscular fat dispersed throughout the lean meat. More marbling generally equates to a more flavorful and tender steak. Look for steaks with abundant, evenly distributed marbling.
-
Grade: In the United States, the USDA grades beef based on factors like marbling, maturity, and muscle quality.
- Prime: Represents the highest quality, with abundant marbling.
- Choice: The next level down, offering good marbling and flavor.
- Select: The leanest grade, with less marbling and flavor.
While Prime steaks are the most sought after, a well-marbled Choice grade New York Strip can still deliver an outstanding dining experience.
Enhancing Flavor with Herbs and Garlic
While a high-quality New York Strip boasts impressive flavor on its own, a little help from aromatic herbs and garlic can elevate it to new heights. These ingredients don't mask the steak's natural taste; instead, they complement and enhance it.
-
Garlic: Infusing the steak with garlic flavor is a classic technique. Crush fresh garlic cloves and rub them directly onto the steak before cooking, or add them to the pan during searing.
-
Herbs: Fresh herbs like rosemary, thyme, and oregano pair beautifully with beef. Add sprigs of herbs to the pan during searing, or create a simple herb butter to melt over the cooked steak.
Experiment with different combinations of herbs and garlic to find your favorite flavor profile. Remember, a little goes a long way – the goal is to complement, not overpower, the natural taste of the beef.
Understanding the New York Strip – its characteristics, quality markers, and flavor potential – is crucial to achieving a truly exceptional steak.
But even the finest cut of meat can fall short of its potential if not properly prepared before hitting the heat. This stage, often overlooked, is where the foundation for a perfect steak is truly laid. From thawing to seasoning, these pre-cooking rituals are the unsung heroes of steakhouse-quality results.
Prepping for Perfection: Essential Pre-Cooking Steps
The journey to a succulent New York Strip doesn't begin at the grill or the stovetop. It starts with thoughtful preparation, ensuring that the steak is perfectly poised to cook evenly and develop maximum flavor. Think of these steps as setting the stage for a culinary masterpiece.
The Art of Thawing: Avoiding the Danger Zone
Proper thawing is more than just convenience; it's about food safety and ensuring even cooking. Never thaw a steak at room temperature for extended periods. This invites bacterial growth and compromises the meat's integrity.
Instead, opt for one of these safe and effective thawing methods:
-
Refrigerator Thawing: This is the safest, albeit slowest, method. Place the frozen steak on a plate or in a container to catch any drips, and let it thaw in the refrigerator for 24-48 hours, depending on its thickness.
-
Cold Water Thawing: Submerge the steak in a leak-proof bag in a bowl of cold water. Change the water every 30 minutes to maintain a cold temperature. This method is faster, typically taking a few hours.
-
Microwave Thawing: While the quickest, microwave thawing can be uneven and may partially cook the steak. Use this method only if you plan to cook the steak immediately afterward.
Temperature's Crucial Role: Embracing Room Temperature
Bringing your steak to room temperature before cooking is not an old wives' tale; it's a scientific principle at play. A cold steak will take longer to cook through, leading to uneven cooking – a well-done exterior and a cold center.
Why is this important? Because when a steak goes directly from refrigerator to heat, the outside cooks much faster than the inside. By allowing it to sit at room temperature for about 30-60 minutes, the steak's internal temperature rises, reducing the temperature differential. This promotes even cooking, allowing you to achieve your desired level of doneness throughout the steak.
The Soul of Simplicity: Salt and Pepper
When it comes to seasoning a New York Strip, sometimes less is truly more. A generous application of coarse kosher salt and freshly cracked black pepper is often all you need to unlock the steak's natural flavor.
-
Salt: Salt not only enhances flavor but also helps to draw out moisture from the steak's surface, creating a drier surface that promotes a better sear. Salt generously at least 40 minutes before cooking, or even better, the night before (dry brining).
-
Pepper: Freshly cracked black pepper adds a subtle spice and complexity. Apply it just before cooking to prevent it from burning.
Elevating the Flavor: Optional Seasoning Additions
While salt and pepper provide a solid foundation, don't be afraid to experiment with other flavors. A few well-chosen additions can elevate your New York Strip to new heights.
Consider these options:
- Garlic Powder: A touch of garlic powder adds a savory depth.
- Onion Powder: Onion powder offers a subtle sweetness and aromatic note.
- Dried Herbs: Rosemary, thyme, or oregano can add a touch of earthy complexity.
- Smoked Paprika: For a hint of smoky flavor, try a pinch of smoked paprika.
- Red Pepper Flakes: Add a little heat with a pinch of red pepper flakes.
Remember to apply these additions sparingly, allowing the natural flavor of the beef to shine through. The key is to enhance, not overpower.
Understanding the New York Strip – its characteristics, quality markers, and flavor potential – is crucial to achieving a truly exceptional steak. But even the finest cut of meat can fall short of its potential if not properly prepared before hitting the heat. This stage, often overlooked, is where the foundation for a perfect steak is truly laid.
With the steak properly prepped, the next pivotal step is mastering the cooking process itself. The method you choose, and how skillfully you execute it, will ultimately determine the final outcome.
Mastering the Heat: Grilling and Pan-Searing Techniques
The moment of truth arrives when the New York Strip meets the heat. Two primary methods reign supreme: grilling, with its smoky char, and pan-searing, known for its intense crust. Each demands a specific approach to achieve steakhouse-quality results at home. Understanding the nuances of both techniques is key to unlocking your steak's full potential.
Grilling for Smoky Perfection
Grilling imparts a distinctive smoky flavor and appealing grill marks, making it a favorite for many steak enthusiasts. The key is to manage the heat effectively and achieve a beautiful sear without overcooking the interior.
Preheating: Achieving Optimal Searing Temperature
Patience is paramount when grilling. Ensure your grill is screaming hot before introducing the steak. For a gas grill, preheat on high for at least 10-15 minutes. For charcoal, wait until the coals are covered with a light gray ash. This intense heat is crucial for creating a desirable sear.
Heat Control: Direct vs. Indirect Heat
Mastering heat control is crucial for a perfectly grilled New York Strip. Direct heat is ideal for searing, creating that beautiful crust. However, prolonged exposure to direct heat can lead to burning. Once seared, move the steak to indirect heat (away from the direct flame or coals) to finish cooking to your desired internal temperature. This two-zone approach ensures even cooking.
Timing: Grilling Times Based on Desired Internal Temperature
Grilling time will vary depending on the thickness of your steak and the intensity of your grill's heat. Use a meat thermometer to accurately gauge doneness (more on that later!). As a general guideline:
- Rare (125-130°F): Approximately 3-4 minutes per side on direct heat, then a few minutes on indirect.
- Medium-Rare (130-135°F): Approximately 4-5 minutes per side on direct heat, then a few minutes on indirect.
- Medium (135-145°F): Approximately 5-6 minutes per side on direct heat, then longer on indirect heat.
Remember, these are estimates! Always rely on a meat thermometer for accurate results.
Pan-Searing: The Art of the Crust
Pan-searing offers unparalleled control and the ability to create a deeply caramelized crust, often considered the hallmark of a perfectly cooked steak. The right pan, the right heat, and a few key techniques are all you need.
Pan Selection: The Power of a Cast Iron Skillet
While other pans can work, a cast iron skillet is the gold standard for pan-searing. Cast iron retains heat exceptionally well, ensuring even cooking and a superior sear. Its ability to maintain high temperatures is critical for achieving that perfect crust.
Heat: High Heat for a Beautiful Crust
As with grilling, high heat is essential for pan-searing. Place your cast iron skillet over high heat and let it preheat for several minutes until it's smoking hot. The goal is to achieve intense heat that will quickly sear the surface of the steak.
Temperature: Using a Meat Thermometer for Accuracy
Even with a perfect sear, internal temperature remains the ultimate indicator of doneness. Insert a meat thermometer into the thickest part of the steak to monitor its progress. Remove the steak from the pan when it's about 5-10 degrees below your target temperature, as it will continue to cook during resting.
Sticking: Tips for Preventing Sticking
Sticking is a common frustration when pan-searing. Here are a few tips to minimize this:
- Use enough oil: Coat the bottom of the pan generously with a high smoke point oil like avocado, canola, or grapeseed oil.
- Ensure the pan is hot: A sufficiently hot pan is less likely to cause sticking.
- Don't move the steak too soon: Allow the steak to sear undisturbed for a few minutes before attempting to flip it. A good sear will naturally release the steak from the pan.
- Dry the steak: Pat the steak dry with paper towels before seasoning and searing. Excess moisture can hinder the searing process and promote sticking.
With careful attention to these techniques, you can confidently grill or pan-sear a New York Strip to perfection, achieving a flavorful and satisfying result every time.
With the steak properly prepped and the grill or pan blazing, the next essential element in crafting the perfect New York Strip is understanding the delicate dance between temperature and timing. While visual cues can offer hints, relying solely on them is a recipe for inconsistency. The true secret lies in wielding the power of a reliable meat thermometer.
The Secret Weapon: Temperature and Timing for Doneness
The quest for the perfect New York Strip often hinges on achieving the desired level of doneness. And while experience can offer some guidance, the single most valuable tool in your arsenal is a meat thermometer.
Forget the guesswork, the prodding, and the anxious slicing. A meat thermometer provides the objective data you need to cook your steak to your exact preference, every single time.
The Indispensable Meat Thermometer
Why is a meat thermometer so important? Because internal temperature is the only reliable indicator of doneness.
Visual cues, like firmness to the touch or the color of the juices, can be misleading, varying based on the steak's thickness, fat content, and cooking method. A thermometer removes all ambiguity, allowing you to confidently achieve your desired result.
There are several types of meat thermometers available, from inexpensive analog models to sophisticated digital versions with instant-read capabilities.
An instant-read thermometer is highly recommended for its speed and accuracy. Simply insert the probe into the thickest part of the steak, away from bone or fat, and you'll have a reading in seconds.
Navigating the Temperature Landscape: A Doneness Guide
Understanding the internal temperature ranges for different levels of doneness is crucial for achieving your preferred result. Here's a comprehensive guide:
-
Rare: 125-130°F (52-54°C). The center will be cool, bright red, with a very soft texture.
-
Medium-Rare: 130-135°F (54-57°C). The center will be warm, red, with a slightly firmer texture than rare. This is a very popular choice that allows for a juicy and tender steak.
-
Medium: 135-145°F (57-63°C). The center will be pink, with a noticeably firmer texture.
-
Medium-Well: 145-155°F (63-68°C). Only a slight hint of pink remains in the center. The steak will be considerably firmer.
-
Well-Done: 155°F+ (68°C+). The steak will be uniformly brown throughout, with a firm and somewhat dry texture.
Remember, these are target temperatures. The steak's internal temperature will continue to rise slightly (carryover cooking) even after it's removed from the heat.
Therefore, it's best to remove the steak from the grill or pan when it's about 5°F (3°C) below your target temperature.
The Peril of Overcooking
While personal preference dictates the ideal level of doneness, one thing is universally undesirable: an overcooked steak.
Overcooking dries out the meat, rendering it tough and flavorless. The proteins in the muscle fibers seize up, squeezing out precious moisture.
The difference between a perfect steak and an overcooked one can be a matter of just a few degrees.
That's why precise temperature monitoring is so crucial. Don't let your precious New York Strip fall victim to the tragedy of overcooking.
Embrace the meat thermometer, master the temperature ranges, and unlock the secret to consistently perfect steak, every time.
Achieving the Perfect Crust: The Art of the Sear
Achieving that deeply browned, flavorful crust is arguably the most visually appealing and texturally satisfying aspect of a perfectly cooked New York Strip. It's more than just aesthetics; it's the foundation upon which the steak's rich, complex flavors are built. Without a proper sear, you're missing out on a crucial layer of flavor and texture that elevates the entire experience.
Why a Good Sear is Essential
A beautifully developed crust isn't just for show. It plays a vital role in the overall enjoyment of your steak.
- Flavor Enhancement: The sear creates hundreds of new flavor compounds. These contribute to the steak’s savory depth and complexity.
- Texture Contrast: The crisp, slightly charred exterior provides a delightful contrast. This complements the tender, juicy interior.
- Moisture Retention: While not a complete seal, a good sear helps to minimize moisture loss during cooking. This contributes to a more succulent final product.
The Maillard Reaction: Unlocking Flavor
The magic behind that irresistible crust lies in the Maillard reaction. This is a complex chemical reaction between amino acids and reducing sugars. It occurs at high temperatures and is responsible for the browning and development of hundreds of flavor compounds.
How to Achieve the Maillard Reaction
To coax the Maillard reaction into action, you need to provide the right conditions:
- High Heat: The surface of the steak needs to reach a high temperature, typically above 300°F (150°C).
- Dry Surface: Moisture is the enemy of a good sear. Pat the steak completely dry with paper towels before seasoning.
- Direct Contact: Ensure the steak has direct, even contact with the hot cooking surface. This maximizes the browning potential.
Tips for Even Searing
Achieving an evenly browned crust requires attention to detail and a few key techniques:
- Don't Overcrowd the Pan: Cook one or two steaks at a time. Overcrowding lowers the pan's temperature, hindering the searing process.
- Use a Heavy-Bottomed Pan: Cast iron skillets are ideal. They retain heat exceptionally well and distribute it evenly.
- Avoid Moving the Steak Too Much: Let the steak sit undisturbed for a few minutes per side. This allows the Maillard reaction to work its magic. Resist the urge to constantly move or flip it.
- Press Gently: If certain areas aren’t making full contact, press the steak gently to ensure even browning.
Choosing the Right Oil: Smoke Point Matters
The type of oil you use is crucial for achieving a good sear. It needs to have a high smoke point, meaning it can withstand high temperatures without breaking down and creating acrid flavors.
High Smoke Point Oils to Consider
- Avocado Oil: Boasts one of the highest smoke points, making it ideal for searing.
- Refined Coconut Oil: Has a neutral flavor and high smoke point.
- Ghee (Clarified Butter): Adds a rich, nutty flavor and has a higher smoke point than regular butter.
- Canola Oil: A readily available and relatively inexpensive option with a decent smoke point.
Avoid using oils with low smoke points, such as extra virgin olive oil, as they will smoke and burn at high temperatures, imparting an unpleasant taste to your steak.
Achieving that perfect crust and nailing the internal temperature are significant milestones, but they're not the final step. There's one more crucial element that separates a good steak from a great steak: allowing it to rest. This simple act, often overlooked, is the key to unlocking maximum juiciness and flavor.
Rest and Relax: Unlocking Juiciness Through the Art of Resting Your Steak
Why Resting is Absolutely Crucial
Imagine a freshly cooked steak. The heat of the grill or pan has caused the muscle fibers to contract and squeeze out moisture. If you were to cut into it immediately, all those flavorful juices would simply spill out onto your plate, leaving you with a drier, less satisfying piece of meat.
Resting allows those juices to redistribute throughout the steak. As the muscle fibers relax, they reabsorb the moisture, resulting in a more evenly juicy and tender final product. Think of it as giving the steak a chance to recover and rehydrate after its intense cooking experience.
It’s not just about moisture, either. Resting also allows the carryover cooking process to complete, ensuring that the internal temperature is consistent throughout. This prevents a situation where the center is perfectly cooked but the outer layers are overdone.
The Sweet Spot: How Long Should You Rest Your Steak?
Determining the optimal resting time depends on the size and thickness of the steak. A general guideline is to rest your New York Strip for at least 5-10 minutes.
For thicker cuts, you might even want to extend that to 15 minutes or longer. There is a lot of debate on the topic, but it is always better to rest longer (more on that next).
A good rule of thumb is to rest the steak for roughly half the time it took to cook it. So, if you seared and cooked your steak for a total of 12 minutes, aim for a 6-minute rest.
Keeping it Warm (Optional): The Foil Tent Trick
One common concern about resting is that the steak will get cold. While a slight temperature drop is inevitable, it's a worthwhile trade-off for the juiciness you'll gain. However, if you're worried about it cooling down too much, you can use a simple trick: tenting the steak with foil.
Gently drape a piece of aluminum foil over the steak, being careful not to wrap it too tightly. The foil will help to retain some of the heat without steaming the steak, which can ruin that beautifully seared crust we worked so hard to achieve.
Important Note: Avoid wrapping the steak tightly in foil, as this will trap steam and can lead to a soggy exterior.
Think of the tent as a breathable blanket. The goal is to keep it warm without continuing to cook it.
More Resting Is Okay!
An interesting thing happens if you rest a steak for way longer than you expect. For example, say you finish cooking it but the sides aren't ready. Don't fret! In that case, put the steak on a wire rack on a baking sheet, put a pat of butter on top, and put the steak in an oven set to 170F (or the lowest your oven will go).
Because the oven is significantly lower than the target doneness of the steak, it will still rise in temp a little, but it will do so incredibly slowly. This can allow you to rest the steak for up to an hour without any degradation in quality!
Trust the Process
Resting a steak requires patience, but the rewards are well worth the wait. By allowing the juices to redistribute and the muscle fibers to relax, you'll transform an ordinary steak into an extraordinary culinary experience. Trust the process, resist the urge to cut in too soon, and savor the juicy, flavorful results.
Serving and Savoring: Completing the New York Strip Experience
You've diligently followed each step, nurturing your New York Strip from its raw state to a perfectly cooked masterpiece. Achieving that perfect crust and nailing the internal temperature are significant milestones, but they're not the final step. There's one more crucial element that separates a good steak from a great steak: allowing it to rest. This simple act, often overlooked, is the key to unlocking maximum juiciness and flavor.
With your rested steak ready, it's time for the final flourish: transforming that culinary accomplishment into a complete and memorable dining experience. The right serving techniques, sides, and sauces can elevate your New York Strip from a simple meal to a truly unforgettable feast.
The Art of the Slice: Against the Grain for Tenderness
The way you slice your steak can significantly impact its perceived tenderness. The key is to cut against the grain.
Muscle fibers run parallel to each other, and slicing with the grain results in longer, tougher strands that are harder to chew. By slicing perpendicular to the grain, you shorten these fibers, making each bite noticeably more tender.
Identify the direction of the muscle fibers, then position your knife at a 90-degree angle to them. Use a sharp knife and a smooth, even slicing motion to create consistent, bite-sized pieces. Aim for slices that are about ¼ to ½ inch thick.
Crafting the Perfect Plate: Side Dish Suggestions
The New York Strip, with its robust flavor, pairs beautifully with a wide range of side dishes. The goal is to create a balanced plate that complements, not overpowers, the steak's inherent richness.
Classic Companions: Timeless Choices
For a timeless and satisfying meal, consider these classic pairings:
-
Roasted Potatoes: Crispy on the outside, fluffy on the inside, potatoes are a natural partner for steak.
-
Asparagus: A simple side of grilled or roasted asparagus adds a touch of freshness and vibrant green color.
-
Creamed Spinach: The creamy richness of creamed spinach provides a luxurious counterpoint to the steak's savory flavor.
Bright and Refreshing: Lighter Options
If you prefer a lighter meal, these options offer a refreshing contrast:
-
Grilled Corn on the Cob: Sweet and smoky grilled corn provides a burst of summer flavor.
-
Caprese Salad: The simple combination of tomatoes, mozzarella, and basil offers a light and tangy counterpoint to the richness of the steak.
-
Green Salad: A simple mixed green salad with a light vinaigrette adds freshness and acidity to the plate.
Sauces: Simple or Bold, It's Your Choice
A well-chosen sauce can elevate your New York Strip to new heights, adding another layer of flavor and complexity. Whether you prefer simplicity or bold flavors, there's a sauce to complement your steak.
Embracing Simplicity: Enhancing Natural Flavors
Sometimes, the best approach is to let the steak's natural flavors shine. Consider these simple options:
-
Garlic Herb Butter: A pat of compound butter, infused with garlic, herbs, and a touch of lemon, melts beautifully over the steak, adding richness and aroma.
-
Red Wine Reduction: A classic accompaniment, a red wine reduction adds depth and complexity without overpowering the steak.
-
Au Poivre: This classic French sauce, made with peppercorns, brandy, and cream, adds a touch of elegance and spice.
Bold and Adventurous: Exploring Flavor Profiles
If you're feeling adventurous, these bolder sauces can create a truly memorable experience:
-
Chimichurri: This Argentinian sauce, made with parsley, garlic, oregano, red wine vinegar, and olive oil, adds a vibrant, herbaceous kick.
-
Béarnaise Sauce: A classic French sauce made with clarified butter, egg yolks, tarragon, and shallots, béarnaise is a rich and decadent accompaniment to steak.
The Final Step: Enjoy!
With your perfectly sliced steak, carefully chosen sides, and complementary sauce, all that's left to do is savor the fruits of your labor. Take a moment to appreciate the aroma, the texture, and the explosion of flavor in your mouth.
Share your culinary creation with friends and family, and bask in the satisfaction of cooking a truly exceptional New York Strip.
Video: Secrets: Perfect Beef Top Loin New York Strip Steak!
Frequently Asked Questions: Perfect Beef Top Loin New York Strip Steak
Here are some common questions about preparing a delicious beef top loin New York strip steak.
What's the key to getting a good sear on my New York strip?
High heat and a dry surface. Pat your beef top loin New York strip steak completely dry with paper towels before cooking. This helps the Maillard reaction, resulting in a beautiful, flavorful crust.
What internal temperature should I aim for when cooking a New York strip steak?
For medium-rare, aim for 130-135°F. For medium, target 135-140°F. Use a reliable meat thermometer for accuracy. Remember the temperature will continue to rise slightly after removing the beef top loin New York strip steak from the heat.
Why is resting the steak so important?
Resting allows the juices to redistribute throughout the beef top loin New York strip steak, preventing them from running out when you slice it. This results in a more tender and flavorful steak.
Can I use a different cut of beef if I can't find a New York strip?
While the beef top loin New York strip steak offers a great balance of tenderness and flavor, ribeye or sirloin steaks can be substituted. Adjust cooking times accordingly, as thickness may vary.